Tutorial: Winged Eyeliner Step By Step
You will need:
- Angled brush (my favourite is the Japonesque one, found HERE)
- Gel Eyeliner, preferably (I love MAC Fluidline in Blacktrack, found HERE)
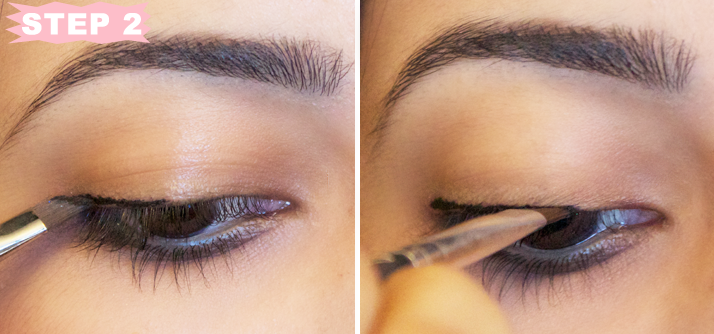
1. Starting from the centre of the eye, draw a thin line towards the outer corner using a small angled brush. Keep the brush close to the lash line and use small strokes to fill in any gaps on the line.
2. Then work from the centre towards the inner corner of the eye until you have a line that runs all along your lash line.
3. To create the flick, position the brush at an angle, edged at the end of the line you drew on Steps 1 & 2. The angle of the line depends on how you want your flick to look; I prefer to follow the natural line of my lower waterline going upwards.
4. Starting from the edge of the flick, draw a line, as straight as possible, towards the eyelid to merge the flick with the line you drew on Steps 1 & 2. Then, fill in any gaps using small strokes. Don’t worry if it doesn’t look perfectly straight, you can always play with it later until you’re happy with the result.
What do you think? I hope this was helpful :) Winged Eyeliner is something I’m still not a pro at, and I’d love to hear some of your tips to perfecting this technique.
Au revoir!
Ysis
Vote for Le Beauty Girl to win ‘Best New Beauty Blog’ in the Cosmo Blog Awards 2012


10 Comments
Rachel Widmer L
Really helpful tutorial :) I’ll definitely try out your tips. i think the key is a really good brush!
Rachel from
http://www.whatabeauty.co.uk x
Le Beauty Girl
Glad you liked it :) xx
Vale
Thank you so much!!!
Your blog is amazing! :)I’d be happy to have a new follower like you! Hope you will check out my blog!Kisseshttp://fashionforpassionvale.blogspot.it/
Ayesha I
I absolutely love your blog Ysis! You’re doing a great job! <3 <3 <3
Yewizzy
Never tried a gel liner before, always seemed like it will be more difficult than my trusted liquid liner..You make it look easier..xx
http://www.shelovesthefinerthings.com/
Le Beauty Girl
Thanks, Ayesha. That means a lot :) xx
Le Beauty Girl
Go on, give it a go. You won’t regret it :) xx
Le Beauty Girl
Thank you :) xx
Paula B
Love your tutorial! How do you make it look so easy?! I think I still prefer liquid eyeliner but I like to mix it up every now and again :) You’re so pretty too! xo
zaamissbowtie
you look really amaze :)